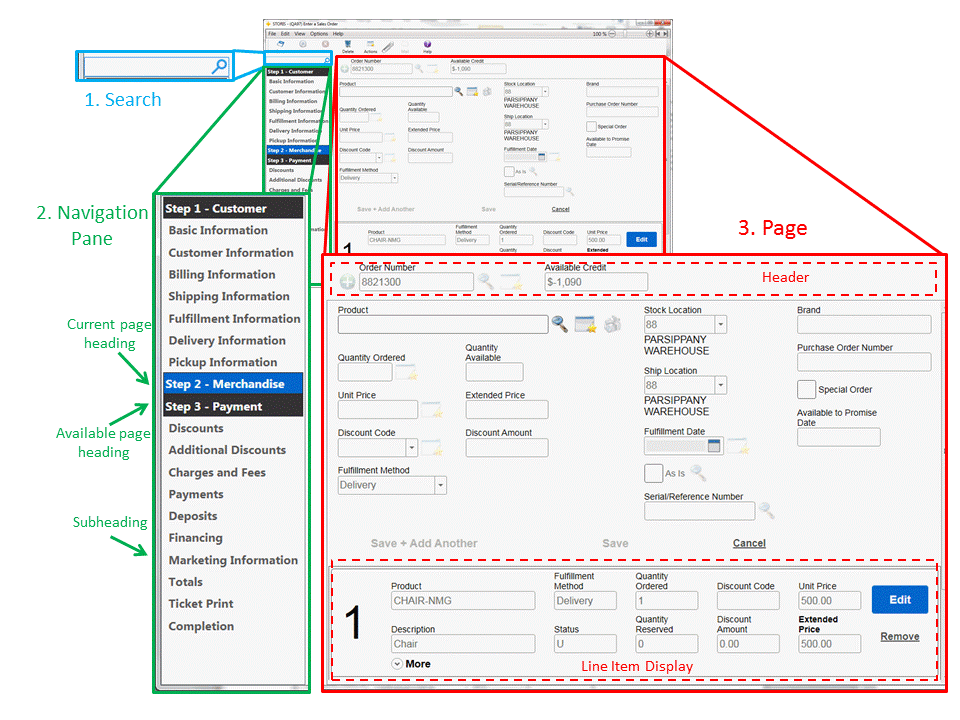
With the current release comes a new look and improved navigation that is divided into 3 major areas: Search, Navigation Pane, and Page. Enter a Sales Order, Enter a Return, Enter an Exchange, Enter a Service Order, Adjust Dollars on a Completed Order, Point of Sale Control Settings, Advanced Product Settings, Warehouse/Store Location Settings, and Advanced Customer Settings. Additional redesigned screens are currently in development. The new areas, along with new terminology, are described below.
Important! The minimum desktop resolution size of 1280 x 768 should be used when running the SCiX client application. Running at a lower resolution causes some STORIS screens to render outside of the desktop boundaries. As a result, you may be required to manually adjust the size, scale, and/or state (maximized, minimized, etc.) of these screens each time they are rendered in order to access some of their components.
1. Search
A new Search feature has been added, allowing you to search by Page Heading, Subheading, or individual Field. Simply begin to type a word and the search automatically retrieves the results based on the characters entered. A search performed on any page retrieves results for the entire process (all pages). Search results appear in the navigation pane (the navigation pane page headings and subheadings disappear to accommodate the search results). When you click on a result, the page navigates to that search result, which is highlighted in blue. Search results that cannot currently be edited are returned as light gray and cannot be selected. Note that grids are currently not searchable.
2. Navigation pane
The navigation pane replaces the tab functionality. Like tabs, the navigation pane is present throughout the routine, although unlike tabs it is now located on the left side of the screen. Furthermore, it is divided into page headings and subheadings.
Page heading - Page headings were formerly known as tab headings. Your current page is highlighted blue in the navigation pane. Available page headings are highlighted black, while unavailable page headings are highlighted gray. When you click on a Page Heading in the navigation pane, the Page displays.
Subheading - Subheadings are listed under their page heading. These subheadings designate the sections within the page. Note that these subheadings represent both major and minor sections of the page. When you click on a subheading, that section of the page displays, with the subheading highlighted in blue.
3. Page
The Page is the entry/viewing area of the screen where the fields are located. The information displayed here may or may not contain a header, entry fields, and the Line Item Display. Navigation within the page has not been altered; you can continue to press the Tab key after entering a field and to navigate from field to field.
Header - The page header includes the "key" to the entry/settings screen, Order Number for example, and displays read-only information about the current process. The exact fields displayed vary with the process used.
Line Item Display - This section replaces the merchandise grid in the above-mentioned order entry routines. (Note that many grids still exist throughout STORIS, even within these redesigned screens.) The Line Item Display section of the page shows each line item with its information contained in its own row. Primary information is always displayed, while secondary information can be exposed by clicking the More expander; this information can be collapsed (hidden) by clicking the More expander again. Rows cannot be edited; to edit information in a row, click the associated Edit button and the product entry fields in the top of the screen populate where they can be edited. The row being edited turns yellow to signify that its information currently is being changed. To remove an item from the Line Item Display (and from the order), click the associated Remove button to delete the row from the order.
