 STORIS Has Touch-Screen Capabilities!
New Features: Clear Text Button, Color Scheme, Right-Click Menus, Scaling Content, Tool Bar, View Menu, Virtual Keyboard, Resolution & Scaling
STORIS Has Touch-Screen Capabilities!In an earlier release (9.5), STORIS was enhanced with new features that include revised screen layouts and the ability to access STORIS using a touch-enabled device. The touch-screen graphic interface is compatible with devices running Windows® 8 and above, such as the Surface Pro and touch-screen PC monitors. This revision of STORIS also functions on devices without touch-screen capabilities, so you can use the same version of SCiX on touch-enabled and non-touch enabled devices.
Screen layouts have been modified for improved functionality on smaller screens. This includes: removing the auto-scaling feature and placing program content into a scroll enabled container, removing the company banner from all screens except the main menu, moving the command bar above the program content as opposed to below it and placing it into a tray container that allows the buttons to remain accessible when they are hidden due to lack of screen real estate. Content scaling is available through a variety of interactive device (i.e. mouse, keyboard) triggers.
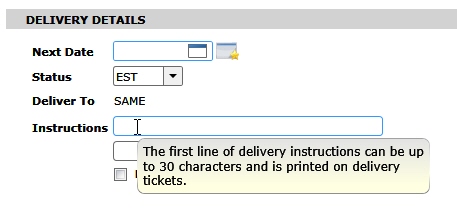
With touch features enabled on your system (see note below), when entering data into an active entry field you can clear your entry using the "clear text" button that appears to the right inside the text box. The button appears as a white X on a blue background, as shown below. You can touch or click this button to clear the contents in the entry box. This is especially useful on touch-enabled screens, as it eliminates the need for you to access the keyboard and backspace to clear the entry.

When working with a field that has a small entry box, the clear text button appears to take up some of your entry space and "hide" part of your data entry. This does not prevent you from entering data in the field. You can still enter the maximum number of characters allowed for the field. When you click or tap the Tab button to move to the next field, the clear text (X) button disappears and the full value appears in the field. (See the following example.)
![]()
![]()
In an effort to avoid conflicts when you choose another display theme in Windows®, several changes have been made using Windows® system colors for STORIS screens. NOTE: Screen samples shown in this topic are based on a default Windows® 7 theme. Some of the colors may vary on your screen, based on the revision of Windows you are using and whether or not you have selected another Windows display theme.
Pop-up "bubbles" used to display tool tips and hover text for command buttons now appear using a Windows® system color, as shown in the following image.
Active text box fields are now outlined in a Windows® system color - in the example shown above, they appear with a blue border highlight.
In the example shown below, active buttons (tool bar, search, action, etc.) appear with a blue background.
Warning!! It is not advisable to change your screen's contrast settings while in a SCiX session. This can cause some portions of the SCiX screens to become unreadable.
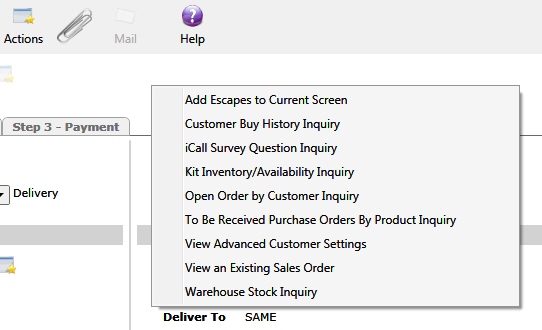
When on a touch-enabled tablet without a keyboard, you can access right-click menus in STORIS by touching and holding your finger on the screen for about 2 seconds and then releasing. (You touch the screen in the same spot where you would right-click the mouse if using one.) This feature is available any place in STORIS where you can access a menu or list of options using the right mouse button.
For example, to access the dynamic escapes menu from Enter a Sales Order, using your stylus or finger touch the screen and hold for a couple of seconds and then release your finger or stylus. The right-click menu appears.
You can scale the application screen content using any of the following methods, depending on the type of device you use to run STORIS. Your scaling changes are retained as long as you are in the current SCiX session, or until you use one of the controls to reset it.
Zoom Control Bar - The top right side of all STORIS screens contains a set of controls that you can use (click or touch) to adjust scaling of the screen content. You can use the plus and minus buttons to scale up/down in 1% increments. The slider adjusts in 10% increments. The right and left arrow buttons allow you to automatically scale the content to the approximate size of the window.
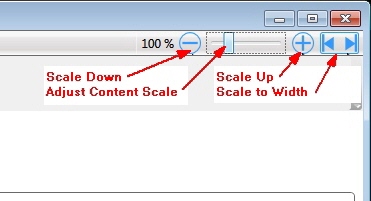
Ctrl Key - The plus/minus buttons in the zoom bar can also be activated by simultaneously pressing the Ctrl and “+” or Ctrl and "-" keys. In addition, you can press the Ctrl key and move the mouse wheel up or down at the same time to adjust the content scale up/down in 10% increments. To reset the content scale to 100%, hold the Ctrl key and press down on the mouse wheel at the same time.
Pinch Zoom - If you are using a touch screen, you can scale the content up or down in 10% increments by using your fingers to touch the screen in a pinch/pull motion.
 When you
change the scale of the application screen content so that it does not
fit the size of the window, scroll bars appear providing access to the
content that does not fit.
When you
change the scale of the application screen content so that it does not
fit the size of the window, scroll bars appear providing access to the
content that does not fit.
Exiting an application screen does not automatically reset the content
scale. The scale you set remains until you either use one of scaling methods
above or the View Menu (see below) to reset it, or until you log out of
your SCiX session.
The top portion of all STORIS application screens has been modified to now include the relocated Tool Bar. The Company Banner remains visible on the main menu screen, but has been removed from all STORIS application screens. The tool/command bar has been relocated from the bottom of the screen to the top in the area previously used for the company banner. The order of the command icons has also been re-arranged.
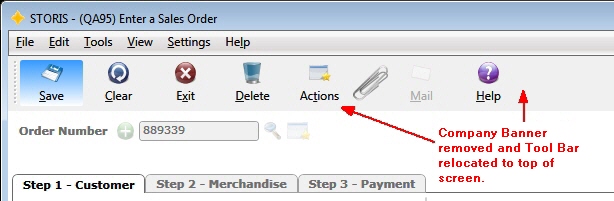
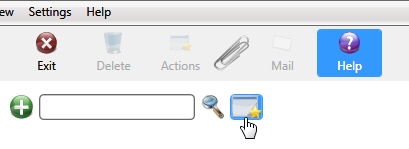
If the screen is too narrow to display all of the available commands, the icons in overflow are automatically hidden. You can click or touch the overflow access button to display the remainder of the tools. (See image below.)

The menu bar now includes a new View Menu that provides options for resetting screen defaults. A description of each option follows the screen image.
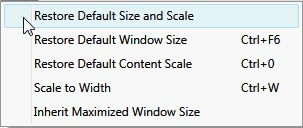
Restore Default Size and Scale - Select this option to rescale the window content to its default of 100% and resize the window to the default size as set in STORIS. This option is disabled when the screen size is at its default value and the content scale is at 100%.
Restore Default Window Size (Ctrl+F6) - Select this option to resize the window to the default size as set in STORIS. The option is disabled when the screen size is at its default value. Alternately, you can use the Ctrl and F6 keys simultaneously to perform the same action.
Restore Default Content Scale (Ctrl+0) - Select this option to rescale the window content to its default of 100%. The option is disabled when the content scale is at 100%. Alternately, you can use the Ctrl and 0 (zero) keys simultaneously to perform the same action.
Scale to Width (Ctrl+W) - Select this option to automatically scale the content to the “approximate” width of the window. Alternately, you can use the Ctrl and W keys simultaneously to perform the same action.
Inherit Maximized Window Size - Use this option to determine how screens are rendered. If you click to select this option a check appears next to the menu item. When you check this option and a screen is maximized, any sub-screen accessed from that screen is maximized by default. With this option checked, all screens subsequently accessed during this session appear maximized. If you leave this option unchecked, sub-screens display at their “restore” size. STORIS proportionally adjusts the restore size of screens based upon the ratio of change that was performed on a previous screen. This means if you manually resize a STORIS screen smaller or larger while it is in its restore state, the next screen is rendered in its restore state smaller or larger by the same ratio that the previous screen was changed.
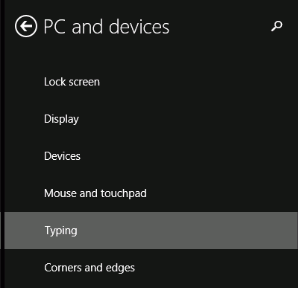
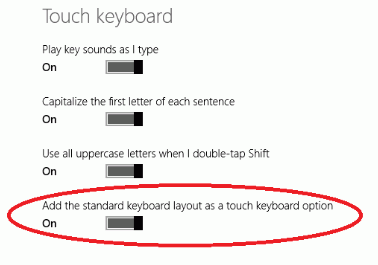
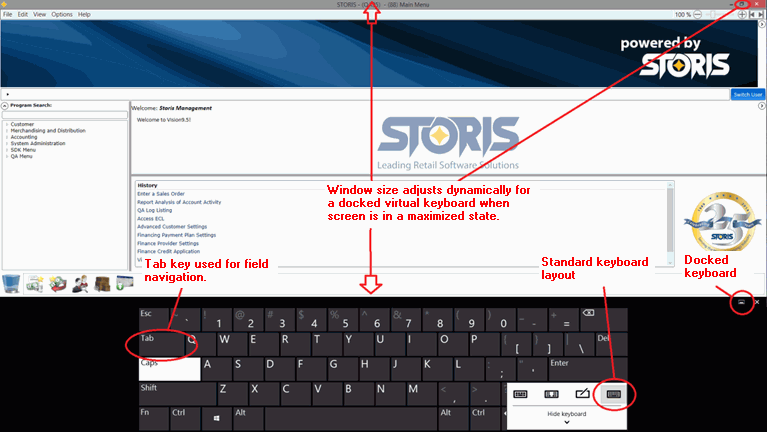
For Windows 8+ devices that rely on using a virtual keyboard for data entry, we recommend using the “standard” virtual keyboard, as the Tab key is readily available for navigation. This setting is disabled on Windows 8 by default and can be changed by accessing the "PC and devices" option from the PC Settings menu on the tablet. Next select “Typing” and then activate the "Add the standard keyboard layout as a touch keyboard option" setting. (See image below.)
If touch features are available on your system (via STORIS licensing) and your device is set up to use the virtual keyboard, you can touch inside of an entry field and automatically display the touch keyboard on your screen. In Windows 8 if the screen is maximized and the keyboard is set to docked, the window size is automatically adjusted dynamically for a docked virtual keyboard. (See example below. Also see Important note below.)
Important!! There is a known Windows
10 OS issue when running applications on any of these tablet devices:
MS Surface Pro 2, 3, & 4 with optional keyboard; MS Surface 3 with
optional keyboard. The onboard touch keyboard does not resize in maximized
desktop applications, including the STORIS SCiX application. To rectify
this issue, set your STORIS session slightly smaller than the max screen
size and the onboard keyboard will work properly.
Make sure Tablet Mode is turned OFF.
When setting up your Surface Pro 4 on Windows 10, the resolution should be set at a minimum of 1280 x 960.
In addition, for proper scaling of STORIS screens, the maximum Display > Scale and Layout setting is 125%.