To use a Label Matrix template in STORIS, you must first save it in one of the three folders described in the Label Matrix Overview topic.
The following is a brief description of the process of creating a simple label template via Label Matrix®. For a more thorough explanation of this and more advanced features, consult the Label Matrix documentation. You can also find additional information in the FAQ named "How Do I Create Labels in Label Matrix?".
![]() You can also use the Forms Designer to create label forms.
You can also use the Forms Designer to create label forms.
To use a Label Matrix template in STORIS, you must first save it in one of the three folders described in the Label Matrix Overview topic.
When you open Label Matrix, you must first decide whether to
create a new label from scratch, or
create a new label based on an existing label. If the label you want to create resembles an existing label, it may be faster to open the existing label, rename it, and add your modifications to the renamed label.
In Label Matrix, when you click on the Open a Recently Used Label option, you make available the label templates listed in the box below the field . If the label you want does not appear on the list, click on Find an Existing Label and then OK to search for the label. The folders where templates are stored are listed in the Label Matrix Setup in the section called Storage Folders for Label Matrix Files.

Figure 1
Figure 2 shows the sample template SAMPBRC.QDF renamed to SAMPBRCMAG.QDF and ready for editing on the main editing screen in Label Matrix. The yellow rulers on the top and left side of the palette indicate the current size of the label template. Above the horizontal ruler is a row of buttons, the function of each you can determine by hovering your mouse over the button. To the left of the vertical ruler is a column of buttons containing various editing functions such as Add Text, Add Picture, and Add Bar Code.
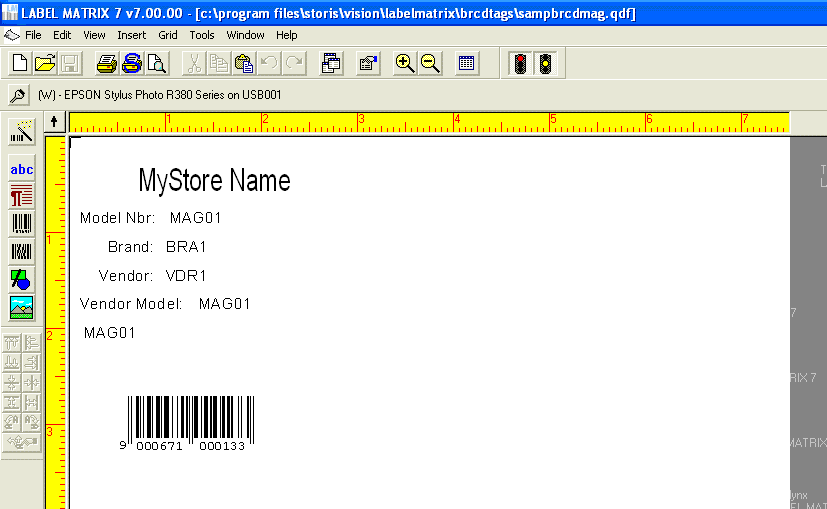
Figure 2
The text on the left side (for example, Model Nbr) of the template are field names. Label Matrix calls these types of text fields Constant fields because appear the same on every label you print from this template. Next to the Constant fields are Database fields (for example, MAG01), so called because they pull data from a database and thus differ from label to label.
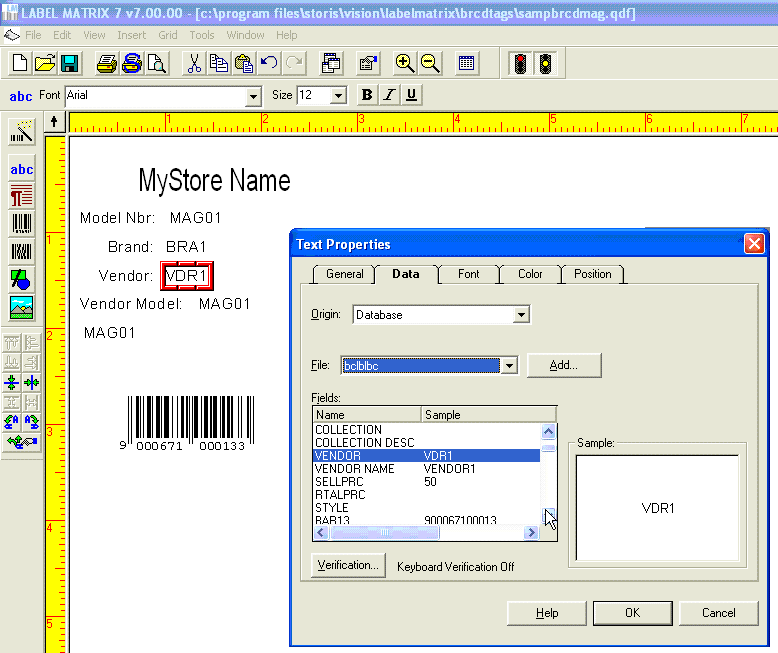
Figure 3
To edit a field, double-click on it. A pop-up window appears. In Figure 3 below, the orange box around VDR1 indicates the field has been selected for editing. In the Text Properties window, the Origin field indicates field is a Database field, and the scroll box below lists the database fields available for selection. VDR1 is highlighted, indicating it is the current selection for this field.
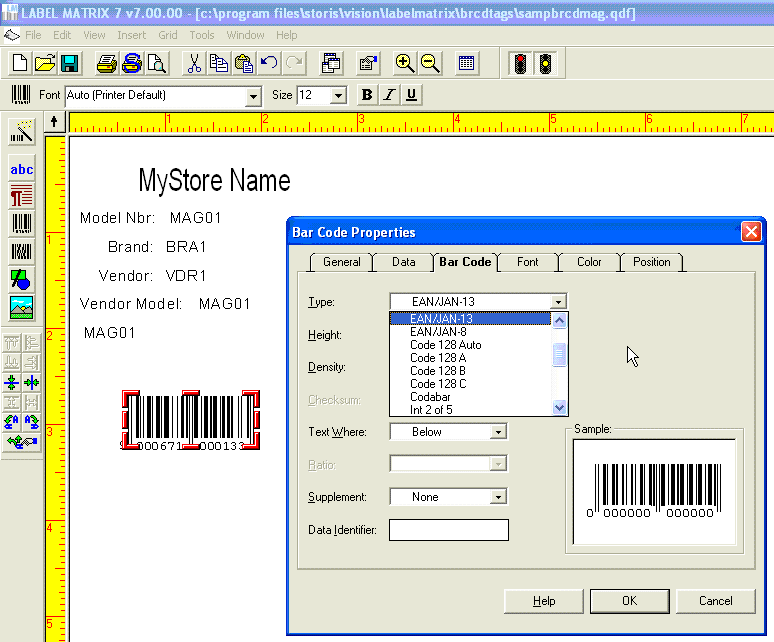
Figure 4
To edit a bar code, double-click on it and then select the Bar Code tab from the text properties window. If you click on the arrow next to the Type field, a drop-down list of available bar code types appears, from which you can make a selection.
![]() STORIS suggests you consult with a representative to make sure you are using the proper bar code types for your labels.
STORIS suggests you consult with a representative to make sure you are using the proper bar code types for your labels.
Our sample label is not very big. It takes up less than a quarter of the 8.5” by 11” template. Label Matrix provides a convenient feature where you can divide the template into portions. If you click on the File pull-down menu and select Page Setup, you access the Label Properties screen as shown in Figure 5. If you click on the Multiple tab, then adjust the Quantity field for both the Across amount and Down amount, you can divide your large template into smaller sections. The example above shows four sections. This template now prints four identical labels on one 8.5 x 11 sheet. Note that you can edit only one of the palettes, and the edits you make affect all palettes. Figure 6 shows the Print Preview screen after the template was divided in to four parts.

Figure 5
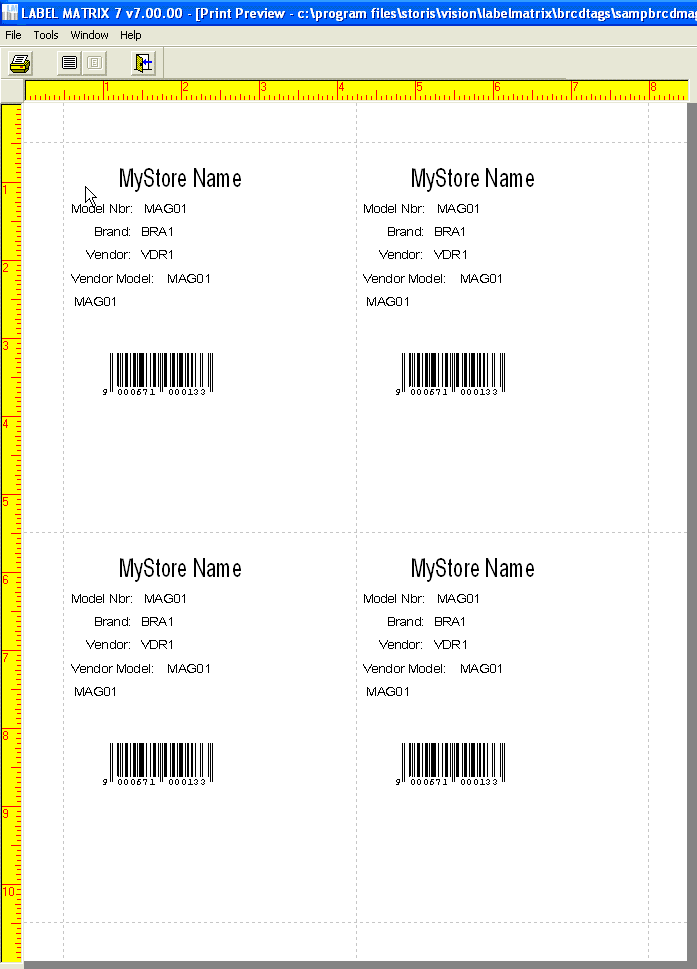
Figure 6
![]() Important! Make sure when you save your template you store it in the proper folder so STORIS can find it when you run the label print program. See the section above on storage folders for more information.
Important! Make sure when you save your template you store it in the proper folder so STORIS can find it when you run the label print program. See the section above on storage folders for more information.